A simplified front end architecture solution for AEM
Here's a simplified front end architecture that makes development in AEM easier for front end devs without complicating things for the back end devs.Tl;dr
- Simplify your build process using some of AEM's built-in features.
- Use a Maven Sass plugin so you're not limited to plain-old CSS or forcing back end devs to deal with gulp builds.
- Create a simplified and optional gulp workflow that will sling updated files to AEM.
AEM (Adobe Experience Manager) isn't the most front end developer friendly enterprise content management solution out there. It's extremely heavy-handed and dependent on Maven builds that generally don't have access to a lot of the goodies us front end developers have grown accustom to in the instantaneous Gulp utopia. Out of the box you're dealing with plain-old CSS and having to wait for long builds to finish to see if your 1-line change worked, who does that anymore?
There are a few solutions to this problem, one being (shameless plug) Iron (fe) which is an AEM front end framework I helped out on that includes a component generator. Iron extracts the entire front end code out into a separate, independent space then builds, bundles and pushes your front end to AEM. It works for very complex projects however it's massive overkill for simple AEM implementations, requires some ramp-up time for devs to get use to its structure, and can also provides complications for back end developers and architects.
A simple solution
After trying out a lot of different architectures I came up with a slightly opinionated solution that has worked extremely well so far. It keeps things simple and goes back to the question of "what exactly is required for this project that AEM cannot provide out of the box?"
Let's take a look at what this will take care of:
- Sass for styles compiled via Maven build (no compiled code in source control, anyone/anything can run a build)
- JavaScript concatenation via AEM
- Predictable file structure
- Optional automagic builds and file deployment to AEM
While that's not a huge list of features it's a good platform to start from for the majority of projects, and provides the bare necessities for efficient and quick front end development while not causing any headaches for architects or back end devs.
File Structure
File structure and location is completely subjective, however I will say that the structure outlined here has been the most pleasant to work with compared to other front end AEM structures I've worked with. I tried to put everything in predictable locations as one of my biggest pet peeves with AEM is that there are so many different directories it's incredibly difficult to find stuff the majority of the time.
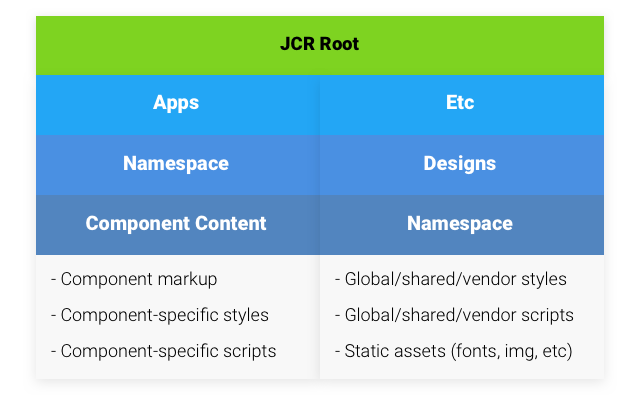
As you can see from the diagram above, the code is essentially split up based on type:
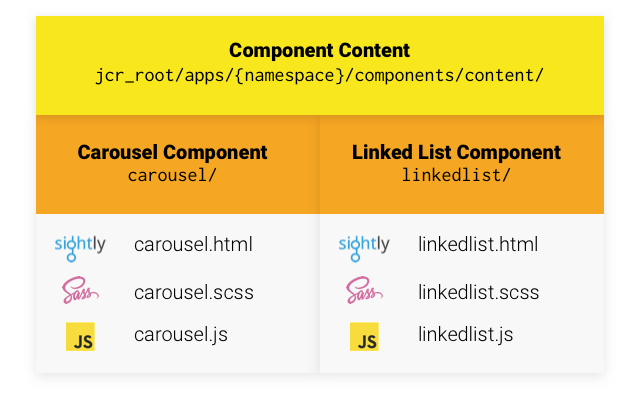
- Component-specific templates, scripts, and styles are all within
jcr_root/apps/{namespace}/components/content - Global/utility styles and scripts, vendor libraries, and static assets are all within
jcr_root/etc/designs/{namespace}/
This more or less goes along with standard practice and means that assets are predictable and easy to find. If you're developing a carousel component there's no constant switching between two massively separate directories, all of the code relative to the carousel is in one place, it's completely self-contained. From a maintenance point of view alone this sort of modular structure enhances maintainability and ease of onboarding massively.
Given that the majority of the time you'll have a few extra vendor libraries and a couple global/utility files (namespace creation/general event binding and library instantiation on the JavaScript side, mixin/variable declarations and shared layout/utility class declarations on the Sass side), tossing a large amount of styles and scripts randomly in the component content section would pollute that hierarchy and really isn't semantically correct as they are design-related. That's where the etc/designs hierarchy comes into play.
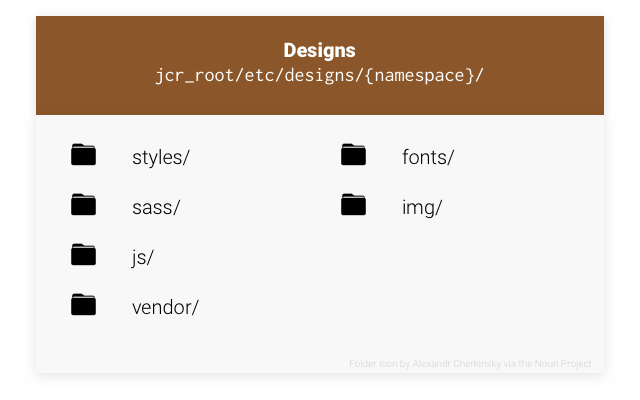
The designs section is a little more open to interpretation as every project is going to be different and everybody likes to structure things their own way. The one important caveat to note is that the main .scss file needs to be completely independent from the rest of the sass files, otherwise you'll wind up with every single one of your source .scss files being converted into .css files. Trust me, you don't want that. In the case of the diagram above, with this in mind the styles/ directory would contain 1 file: main.scss and that would import the files in the sass/ directory and get built into main.css.
Getting Sass to work
Now that we've got a general idea of where things should go we can start setting up some scaffolding and get an actual build running. We'll start with getting our Maven build compiling Sass first since that's the biggest hurdle.
Before we continue, there are ways to have Maven download and install npm and everything necessary to run your build at run time, however I've seen this work inconsistently and I've heard it can cause issues on some environments. What we're after is a simplified solution that will run anywhere, anytime consistently.
The Maven build
I've tried a few different Maven plugins for Sass compilation, and so far my favorite has been the libsass-maven-plugin by @warmuuh. It's essentially just a wrapper for libsass so it's very robust in the options it provides, however there are some limitations that you may have to play around with to find workarounds.
All we have to do is add the plugin to our UI pom and configure it to use the correct files and paths.
<!-- /(namespace)-ui/pom.xml -->
<build>
  <plugins>
    <plugin>
      <groupId>com.github.warmuuh</groupId>
      <artifactId>libsass-maven-plugin</artifactId>
      <version>0.1.6-libsass_3.2.4</version>
      <executions>
        <execution>
          <id>compile-sass</id>
          <goals>
            <goal>compile</goal>
          </goals>
          <configuration>
            <inputPath>${project.basedir}/src/main/content/jcr_root/etc/designs/(namespace)/styles</inputPath>
            <includePath>${project.basedir}/src/main/content/jcr_root/etc/designs/(namespace)/sass:${project.basedir}/src/main/content/jcr_root/apps/(namespace)/components</includePath>
            <outputPath>${project.basedir}/src/main/content/jcr_root/etc/designs/(namespace)/css</outputPath>
            <outputStyle>compressed</outputStyle>
            <generateSourceMap>true</generateSourceMap>
            <sourceMapOutputPath>${project.basedir}/src/main/content/jcr_root/etc/designs/(namespace)/css</sourceMapOutputPath>
            <omitSourceMapingURL>true</omitSourceMapingURL>
          </configuration>
        </execution>
      </executions>
    </plugin>
  <!-- . . . -->
  </plugins>
</build>
It's a pretty typical plugin definition until we get to the configuration block, which is where the magic happens. We're doing the following:
<inputPath>: Tell it to use our main files directory as the source. It will compile every single.scssfile inside of this directory, so its best to have your main file separated from the rest of your code for this reason.<includePath>: Set both our main source code directory (etc/designs/namespace/sass) and component content directory (apps/namespace/components) as paths the compiler should look in when handling an@importdeclaration.<outputPath>: Set where the compiled css file should be saved.<outputStyle>: Tell it to compress (minify) the output.<generateSourceMap>: Have the compiler also generate a source map for easier debugging during development.<sourceMapOutputPath>: Tell the compiler where the compiled source map should be saved.<omitSourceMapingURL>: That property name isn't a typo. This just tells the compiler to not automatically inject the source map URL into the finished.cssfile. This was something that needs to be set to true and a URL manually added to the main sass file for Source Maps to work an, I found out the hard way.
Now if we had any code in those directories and we ran a Maven build we'd wind up with a compiled css file and source map wherever we told the compiler to save them. Saucy!
Setting up some Sass scaffolding
I won't go too much in detail in this section, but rather go over some caveats and provide an example of how you could get up and running quickly. The example will include Bootstrap, but can obviously be altered to use any front end framework such as Foundation or Semantic UI.
The globals/sass source directory
We'll start out with the etc/designs/namespace/sass directory, or our actual Sass source. Since every project I implement Bootstrap on it winds up getting heavily extended and customized, I prefer to include the actual Bootstrap source so I can hand pick exactly what gets built and what gets ignored. The source would get tossed into the Sass source directory into a directory bootstrap/. Along with the source code of our framework of choice we'd create some global/utility sass files that we can use for general Sass environment setup and shared or utility classes. Here's an example of what this directory may look like after this:
bootstrap/          // The source code for our framework of choice.
_variables.scss     // Site-wide Sass variables.
_mixins.scss        // Any custom mixins your code requires.
_utils.scss         // Utility classes such as floats, clears, show/hide classes.
components.scss     // Component bulk-import file.
layout.scss         // Layout-specific styles, such as page template scaffolding.
icons.scss          // Custom icon declarations.
forms.scss          // Global form styles.
typography.scss     // Global typography such as headers, color options, links, etc.
globals.scss        // Global styles that don't really fit in anywhere else.
By far and away the most important file in the above example is components.scss, which bulk-@import's all component styles for inclusion in the style sheet. This makes important use of that includePath property we set in the Sass compiler plugin so that the @import declarations are far more readable than they would be otherwise:
// etc/designs/namespace/sass/components.scss

/* . . . */
@import "content/carousel/carousel.scss";
@import "content/linkedlist/linkedlist.scss";
/* . . . */
Since we set that include path, we can request the component files relative to the component content. Super cool! One observation I will note from the last project using this structure was that sometimes I would find this file somewhat inconvenient to get to all the way over here in designs. Semantically it works great, but if I didn't already have the file open in my editor I was always a bit annoyed to have to go all the way over to the designs directory to open it up and add a new component. That being said, you could probably move it somewhere closer to the components and it would be totally fine, such as apps/namespace/components/components.scss.
The main file
Now we'll add our main file that will be used by the compiler to compile our stylesheet. This is in that etc/designs/namespace/styles directory, and can be named whatever you want. I have a habit of naming it main.scss so I can expect the resulting css file to be main.css. This file is essentially just a bulk-importing file that will go through and import all of globals and framework files, followed by all of the components. If you chose to have the compiler generate a Source Map this file will also need a comment of the URL of the compiled source map added to the bottom of it.
// etc/designs/namespace/styles/main.scss

// Custom Variables and mixins
@import "variables";
@import "mixins";
@import "icons";

// Bootstrap imports
/*
  Removing vast majority of them since there are so many,
  but you essentially just copy the entire `bootstrap.scss`
  file into here with your own overrides scattered in between.
*/
@import "bootstrap/variables";
@import "bootstrap/mixins";
// More bootstrap imports...

// Core Overrides
@import "type";
@import "layout";

// Bootstrap Components...

// Globals
@import "utils";
@import "forms";
@import "globals";

// Components
@import "components";

/*!# sourceMappingURL=namespace/css/main.css.map */
The file is a pretty standard main file, with the exception of the source map URL declaration at the very bottom. I tried to remove as much of the Bootstrap stuff as I could to save space, but I left some to show how you'd include them thanks to the relative include paths.
Some dummy component files
Now I'll just show some dummy components to give you the idea of how you'll import them. Let's say we have a super complex component we need to create called the List component, back end has already finished the backing class for it and it just needs front end now. First we'll go in and add that file to our components.scss file:
// etc/designs/namespace/sass/components.scss

@import "content/carousel/carousel.scss";
@import "content/linkedlist/linkedlist.scss";
@import "content/list/list.scss";   // Our new component
Then we'd just create the .scss file in it's component folder. Easy peazy.
// apps/namespace/components/content/list/list.scss

ul.namespace-list {
  list-style: none;
  padding-left: 0;
}
Creating clientlibs
At this stage if we were to run a Maven build we'd wind up with shiny new main.css and main.css.map files in our etc/designs/namespace/css directory. As great as that is, as far as AEM is concerned there are just some annoying files filling up precious space and not doing anything, so now is a perfect time to start creating some clientlibs.
We're going to wind up having 3 different clientlib categories:
namespace-frontend.design: Main clientlib category containing all of the global styles and scripts.namespace-frontend.components: A complimentary design category that will be embedded into the main category.namespace-frontend.vendor: All of our vendor/external clientlibs.
Our main clientlib
We'll start with the namespace-frontend.designs clientlib since that's our main clientlib that will be included in our templates. We embed the components clientlib category in this one
<!-- etc/designs/namespace/.content.xml -->
<?xml version="1.0" encoding="UTF-8"?>
<jcr:root xmlns:sling="http://sling.apache.org/jcr/sling/1.0" xmlns:jcr="http://www.jcp.org/jcr/1.0" xmlns:rep="internal"
    jcr:mixinTypes="[rep:AccessControllable]"
    jcr:primaryType="cq:ClientLibraryFolder"
    sling:resourceType="widgets/clientlib"
    embed="[namespace-frontend.components]"
    categories="[namespace-frontend.design]"
  />
With that in our design root we'll then just set our main compiled CSS file to be included in this clientlib as well as any javascript files we need. The only thing of note here is that we're embedding our component category into this clientlib so that it will be included whenever we inject this clientlib into our templates.
# etc/designs/namespace/css.txt
#base=css

main.css
# etc/designs/namespace/js.txt
#base=js

main.js
utils.js
This should be pretty standard for anybody who has made clientlibs before, all we're doing is directing the clientlib to our files.
Vendor libraries
Chances are you're going to need to include some sort of JavaScript or CSS library on your project, so that's where our vendor clientlib comes into play. This is going to be a separate category than our main design clientlib, so we're tossing this into the vendor/ directory of our design directory.
<!-- etc/designs/namespace/vendor/.content.xml -->
<?xml version="1.0" encoding="UTF-8"?>
<jcr:root xmlns:sling="http://sling.apache.org/jcr/sling/1.0" xmlns:jcr="http://www.jcp.org/jcr/1.0" xmlns:rep="internal"
    jcr:mixinTypes="[rep:AccessControllable]"
    jcr:primaryType="cq:ClientLibraryFolder"
    sling:resourceType="widgets/clientlib"
    categories="[namespace-frontend.vendor]"
  />
In typical AEM fashion, the libraries going in the vendor/ directory get split up into css/ and js/ directories, which we'll just include via the css.txt and js.txt files in the vendor root.
# etc/designs/namespace/vendor/js.txt
#base=js

bootstrap.carousel.js
bootstrap.collapse.js
jquery.validate.js
Adding component scripts
Now we've got all of our vendor libraries set up, our main scripts and all of our styles ready to go, but now it's time to get component-specific javascript hooked into everything. This is where we're going to make use of that namespace-frontend.components clientlib category. Each component that requires a script will have it's own clientlib declaration that mates it to that category, which if you'll remember from earlier is being embedded into our main designs clientlib.
<!-- apps/namespace/components/content/linkedlist/js/.content.xml -->
<?xml version="1.0" encoding="UTF-8"?>
<jcr:root xmlns:sling="http://sling.apache.org/jcr/sling/1.0" xmlns:jcr="http://www.jcp.org/jcr/1.0" xmlns:rep="internal"
    jcr:mixinTypes="[rep:AccessControllable]"
    jcr:primaryType="cq:ClientLibraryFolder"
    sling:resourceType="widgets/clientlib"
    categories="[namespace-frontend.components]"
  />
# apps/namespace/components/content/linkedlist/js/js.txt linkedlist.js linkedlist.item.js
It's worth noting that the structure of the component directory is completely subjective. You can have something like:
apps/namespace/components/content/linkedlist/
  js/
    .content.xml
    js.txt
    linkedlist.js
or:
apps/namespace/components/content/linkedlist/
  .content.xml
  js.txt
  js/
    linkedlist.js
The concept is the same, so use whichever structure works for you and your project.
Adding our clientlibs to templates
This should be pretty trivial to anyone who is already well-versed in clientlibs in AEM, so I won't go into extreme detail on this. All you need to do is include the main design clientlib category and our vendor clientlib. I generally have my vendor libraries included before my main designs.
<!-- apps/namespace/components/page/global/head.html -->
<head data-sly-use.clientLib="${'/libs/granite/sightly/templates/clientlib.html'}">

  <sly data-sly-unwrap data-sly-call="${clientLib.css @ categories='namespace-frontend.vendor'}" />
  <sly data-sly-unwrap data-sly-call="${clientLib.css @ categories='namespace-frontend.design'}" />
</head>
<!-- apps/namespace/components/page/global/body.html -->
<body data-sly-use.clientLib="${'/libs/granite/sightly/templates/clientlib.html'}">
<div id="wrapper">
<header id="header" data-sly-include="header.html"></header>
<div id="content" class="container" data-sly-include="content.html"></div>
</div>
<footer id="footer" data-sly-include="footer.html"></footer>
<sly data-sly-unwrap data-sly-call="${clientLib.js @ categories='namespace-frontend.vendor'}" />
<sly data-sly-unwrap data-sly-call="${clientLib.js @ categories='namespace-frontend.design'}" />
</body>Now we have a working Sass build via Maven, component styles/scripts in predictable locations, connected global/utility styles/scripts and vendor libraries. If you have no need for Gulp automation for quicker builds and code deployment to AEM you should be ready to start developing. If not, all that's left is setting up our optional Gulp build.
Gulp Automation for the time-savings
One of the things that really bugs me about most standard AEM setups is that if I need to make a 1-line change to some CSS, JavaScript or template my only options are using CRX/DE (yuck) or running a full Maven build (yuck). Let's bring this build into the modern era with a gulp setup that will automagically sling our compiled Sass and other files to AEM on file change so we're not stuck waiting for slow Maven build.
For the bare minimum all you really need as far as npm packages go is gulp-slang to auto-sling the files to AEM, which you can then fire off in a task or watch block.
If you're interested in an example gulp file, we'll set up one with sass compilation, jslinting and auto-slinging whenever a style, script, or template is updated. First off we need to install some npm packages in our absolute project root and initialize our npm project:
npm init

# utils
npm install --save-dev gulp gulp-watch gulp-plumber gulp-rename gulp-util gulp-watch

# style-related
npm install --save-dev gulp-sass gulp-sourcemaps

# script related
npm install --save-dev jshint gulp-jshint

# aem related
npm install --save-dev gulp-slang
From there we can start on our gulpfile.js by requiring everything we need up at the top of the file:
// gulpfile.js
/* Requires */
var gulp        = require('gulp'),
    watch       = require('gulp-watch'),
    // Utilities
    gutil       = require('gulp-util'),
    plumber     = require('gulp-plumber'),
    slang       = require('gulp-slang'),
    rename      = require('gulp-rename'),
    // Styles
    sass        = require('gulp-sass'),
    sourcemaps  = require('gulp-sourcemaps'),
    // Scripts
    jshint      = require('gulp-jshint');
We then want to specify the paths that we need. This helps readability and maintainability, as namespaces can sometimes change mid-project and if you don't have relative paths this can be a nightmare to refactor.
// gulpfile.js, continued
/* Requires */
// . . .
/* Paths */
var root        = 'namespace-ui/src/main/content/jcr_root/',
    components  = root + 'apps/namespace/components/',
    designs     = root + 'etc/designs/namespace/',

    // Styles
    cssPath     = designs + 'css/',
    sassPath    = designs + 'sass/',
    mainCss     = designs + 'styles/main.scss',
    cssBuild    = cssPath + 'main.css',
    cssSrcMaps  = cssPath + 'main.css.map',

    // Scripts
    jsPath      = designs + 'js/',
    vendorPath  = designs + 'vendor/',

    // Images
    imgPath     = designs + 'img/';
I generally like my console nice and colorful, so before any tasks I usually include some sort of colorful event notification utility function:
// gulpfile.js, continued
/* Requires */
// . . .
/* Paths */
// . . .

/**
 * Helper: changeNotification
 * Logs an event to the console.
 *
 * @param {String} fType - The file type that was changed.
 * @param {String} eType - The event that occured.
 * @param {String} msg - Short description of the actions that are being taken.
 */

function changeNotification(fType, eType, msg) {
  gutil.log(gutil.colors.cyan.bold(fType), 'was', gutil.colors.yellow.bold(eType) + '.', msg);
}
Now we need to set up our sass builds. The key here is to try to replicate the sass build that the Maven build does as closely as possible so there are no noticeable differences between the Gulp build and Maven build. We do this by configuring sass with the same settings we authored in our pom file, creating a task that we can reference in other tasks as well as fire off ourselves when needed, then setting up a task to sling the shiny new files to AEM.
// gulpfile.js, continued
/* Requires */
// . . .
/* Paths */
// . . .
/* changeNotification */
// . . .

/**
 * Task: `sass:build`
 * Compiles the sass and writes sourcemaps.
 */
gulp.task('sass:build', function (cb) {
    gulp.src(mainCss)
        .pipe(plumber()) // Prevents pipe breaking due to error (for watch task)
        .pipe(sourcemaps.init())
        .pipe(sass({
            outputStyle: 'compressed',
            omitSourceMapUrl: true, // This is hardcoded in the main.scss due to resource path issues
            includePaths: [sassPath, components]
        }).on('error', sass.logError))
        .pipe(sourcemaps.write('./', {
            addComment: false
        }))
        .pipe(plumber.stop())
        .pipe(gulp.dest(cssPath));

  // Fire the callback Gulp passes in to tell it we're done
  cb();
});


/**
 * Task: `sass:sling`
 * Slings the compiled stylesheet and sourcemaps to AEM.
 */
gulp.task('sass:sling', ['sass:build'], function () {
  return gulp.src([cssBuild, cssSrcMaps])
    .pipe(slang());
});

/**
 * Task: `sass`
 * Runs the sass build and slings the results to AEM.
 */
gulp.task('sass', ['sass:build', 'sass:sling']);
Next up our JavaScript task, which in this particular instance is extremely light. All we'll be doing is setting up some simple jslinting to keep silly errors at bay in our JS. We won't be minifying the JS as that can be done by AEM out of the box, and we want to make sure this Gulp build is complementary to the Maven build, not a pre-requisite.
// gulpfile.js, continued
/* Requires */
// . . .
/* Paths */
// . . .
/* changeNotification */
// . . .
/* Sass tasks */
// . . .

/**
 * Task: `js:lint`
 * Lints project JS, excluding vendor libs.
 */
gulp.task('js:lint', function () {
  return gulp.src([components + '**/*.js', jsPath + '**/*.js'])
    .pipe(jshint())
    .pipe(jshint.reporter('default'));
});
Last up will be our watch task, which will monitor all template files, scripts and styles for changes so that it can kick off builds immediately. We're going to set up a watch stream for each type of file, which will then kick off a build or deployment for that particular type of code.
// gulpfile.js, continued
/* Requires */
// . . .
/* Paths */
// . . .
/* changeNotification */
// . . .
/* Sass tasks */
// . . .
/* JS tasks */
// . . .

/**
 * Task: `watch`
 * Watches the HTML, Sass, and JS for changes. On a file change,
 * will run builds file-type dependently and sling the new files
 * up to AEM.
 */
gulp.task('watch', function () {
  gutil.log('Waiting for changes.');

  // Set up our streams
  var jsWatch = gulp.watch([components + '**/*.js', jsPath + '**/*.js'], ['js:lint']),
      sassWatch = gulp.watch([components + '**/*.scss', mainCss, sassPath + '**/*.scss'], ['sass']),
      markupWatch = gulp.watch([components + '**/**/*.html', components + '**/**/*.jsp']),
      imgWatch = gulp.watch([imgPath + '**/*']);

  // js needs to be linted
  jsWatch.on('change', function (ev) {
    changeNotification('JS file', ev.type, 'Linting code & slinging to AEM.');

    return gulp.src(ev.path)
      .pipe(slang(ev.path));
  });

  // Sass needs to get built and slung up
  sassWatch.on('change', function (ev) {
    changeNotification('Sass file', ev.type, 'Running compilation & slinging to AEM.');
  });


  // Markup just needs to be slung to AEM
  markupWatch.on('change', function (ev) {
    changeNotification('Sightly file', ev.type, 'Slinging file to AEM.');

    return gulp.src(ev.path)
      .pipe(slang(ev.path));
  });

  // Images just need to be slung to AEM
  imgWatch.on('change', function (ev) {
    changeNotification('Image file', ev.type, 'Slinging file to AEM.');

    return gulp.src(ev.path)
      .pipe(slang(ev.path));
  });
});
So a quick recap on the commands this gulp build provides:
gulp watch- Watches for changes to JavaSript, CSS/Sass, and HTML files, runs any necessary subtasks and slings the result to AEM.gulp sass- Builds all Sass files and slings the compiled stylesheet and source maps to AEM.gulp js:lint- Runs all JavaScript files against JSHint and outputs the results to the console.
Now, if we run gulp watch any component-level and global changes will automagically be built and slung to AEM far faster than it would take to run a Maven build. The best part of this is that it allows for easier front end development, but also allows for the front end to not add any more dependencies to the project that back end devs may not want to deal with. Plus, you don't have to check in any compiled code to version control as the Maven build will generate the compiled code every time.
If you'd like to check out the gulpfile more in-depth, you can view it in its entirety on Github. You can also browse through a full example of this hierarchy with all of the code from this post in place via this repo.